How to Assemble a Complete First Aid Kit essentials & Tips for Your Home
Having a well-stocked first aid kit at home is a simple but important way to stay prepared for minor injuries or emergencies. Whether it’s a small cut, a burn, or a sprain, having the right supplies on hand can help you act quickly and effectively. Here’s a guide to assembling a practical and easy-to-use first aid kit that’s ready when you need it!
Putting together a first aid kit for your home is a proactive way to handle minor injuries and medical emergencies that may occur. A well-stocked first aid kit can provide immediate care and prevent a minor injury from becoming more severe.
Here’s a step-by-step guide on how to assemble a basic first aid kit for your home:
Step 1: Choose a Container:
Select a durable and waterproof container to hold all the first aid supplies. A clear plastic box or a small, portable first aid kit bag with multiple compartments can be ideal for easy organization and quick access.
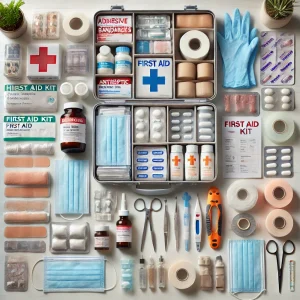
Step 2: Basic First Aid Supplies:
Include the following essential items in your first aid kit:
Adhesive bandages in various sizes
Sterile gauze pads or dressings (different sizes)
Adhesive tape
Antiseptic wipes or solution (e.g., hydrogen peroxide or alcohol wipes)
Tweezers and small scissors (for splinters or debris)
Disposable gloves (latex or non-latex)
Instant cold packs or a reusable cold pack
Thermometer (digital, disposable or mercury-free)
Cotton balls and cotton swabs
Sterile eyewash or eye pads
CPR face shield or pocket mask
First aid manual or instructions
Emergency contact numbers and medical information
Scissors (blunt tip for safety)
Step 3: Medications:
Include a basic supply of over-the-counter medications:
Pain relievers like acetaminophen or ibuprofen
Antihistamines (e.g., Benadryl for allergic reactions)
Antacids for indigestion or heartburn
Anti-diarrheal medication
Calamine lotion for insect bites or rashes
Antibiotic ointment (e.g., Neosporin)
Hydrocortisone cream (for itching, rashes or insect bites)
Personal prescription medications (if needed)
Ensure that all medications are in their original, properly labeled containers and check their expiration dates regularly.
Step 4: Wound Care:
Sterile saline solution (for cleaning wounds)
Hydrogen peroxide or rubbing alcohol (for disinfecting)
Elastic bandages (for sprains or strains)
Butterfly bandages or steri-strips (for closing small cuts)
Burn gel or cream
Step 5: Tools and Equipment:
CPR face shield or mask
First aid manual or instruction booklet
Emergency contact numbers (local hospital, poison control, etc.)
Flashlight (with extra batteries)
Emergency blanket
Step 6: Specialized Items:
Consider any special needs of your family members and add specific items to the kit, such as:
Epinephrine auto-injector (EpiPen) for severe allergic reactions (if applicable)
Prescription medications (if required by family members)
Asthma inhaler or other personal medical devices
Personal medical information and medical history (e.g., allergies, medications, chronic conditions)
Step 7: Additional Supplies (Optional but Helpful):
Depending on your family’s lifestyle and activities, you may want to add these extra items:
List of family members’ medical information (allergies, medications, etc.)
Eye wash solution
Cotton balls and swabs
Face masks
Small notepad and pen
Blister pads or moleskin for foot blisters
Sunscreen and lip balm with SPF
Insect repellent
Emergency blanket
Instant hand sanitizer
Small flashlight with extra batteries
Safety pins and a sewing needle with thread
Step 8: Keep it Accessible and Updated:
Store the first aid kit in a location that is easily accessible to everyone in the household, and make sure all family members know where it is located. Regularly check and replenish supplies to keep the kit up-to-date and ready for use.
Step 9: Familiarize Yourself with First Aid:
Having a well-stocked first aid kit is essential, but it’s equally important to know how to use the supplies correctly. Consider taking a basic first aid course or familiarize yourself with first aid procedures through reliable sources or books.
Tips for Maintaining Your First Aid Kit:
Store Properly: Keep your kit in a cool, dry place that’s easily accessible to all family members.
Check Expiry Dates: Regularly inspect medications and supplies, replacing expired or used items.
Customize for Your Family: Include items specific to your family’s needs, such as baby supplies, EpiPens, pet first aid items or asthma inhalers.
Keep It Portable: Consider a smaller, travel-sized kit for outings or trips.
Choose a Durable Container: Use a waterproof, portable container or bag that’s easy to carry and store.
Label Clearly: Mark the kit as “First Aid” and keep it in an easily accessible location.
Check Regularly: Replace expired medications and replenish used items every 6-12 months.
Where to Keep Your First Aid Kit
Home: Store in a central, easily accessible location (e.g., kitchen or bathroom cabinet).
Car: Keep a smaller version in your vehicle for emergencies on the go.
Outings: Pack a portable kit for hiking, camping, or travel.
Remember, while a first aid kit can be beneficial for minor injuries and emergencies, it is not a substitute for professional medical care. In case of a serious injury or medical condition, always seek immediate medical attention or call emergency services.
Disclaimer: The information provided in this content is for general informational purposes only. It is not intended as medical or healthcare advice, diagnosis, or treatment. Always seek the advice of a qualified healthcare professional with any questions you may have regarding a medical condition or healthcare decisions.